5 Ways to Curl Natural Hair

Being natural can be fun but also frustrating , especially when trying to keep those curls curly. Well here are some effective methods to accomplish that, see which one works best for you!

  1. Bantu Knots

If you’re a Rihanna fan, than you probably already know what these are. Rihanna wore bantu knots at the Grammy’s, she even performed Diamond in them. You may even have seen Crazy Eyes from Orange is the New Black, wearing bantu knots as well. Also known as chiny bumps, bantu knots is a popular way to curl hair in general.

curl1

(http://honoringourhairitage.com/2014/05/07/rihanna-calls-her-bantu-knots-ghetto/)

Chocolate and Vanilla Swirl

curl2

(http://madamenoire.com/289853/is-that-you-what-the-stars-of-orange-is-the-new-black-look-like-outside-of-prison/)

The first step is to section your hair based off of how tight you want you curls. If you’re not sure, you can try one bantu knot and compare it to what you want. Just remember, the smaller the bantu knot, the tighter the curl.

curl5


(http://www.abeautifulmess.com/2015/02/easy-bantu-knots-for-all-hair-types.html)

The second step is to twist the sectioned part of your hair. Avoid doing it too tight because it could lead to difficult detangling and could break your hair.

Third step is to wrap the twist around and around until it looks similar to a knot. It should look like the same knots Rihanna wore at the Grammy’s.

curl4

(http://naturallymemedia.com/natural-hairstyles-bantu-knots/)

Fourth step is to wait then simply pull each knot and untwist. I suggest having the curls in while you sleep. To have the curls hold longer, put product on your hair such as conditioner or hair grease. Style as you please.

curl6

(https://www.pinterest.com/pin/353954851935206392/)
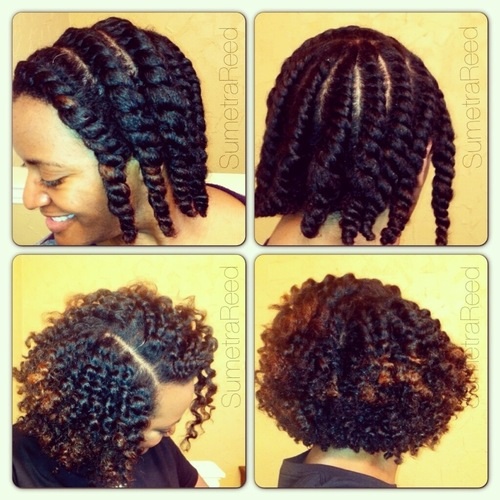
  1. Twist outs

These may be a little complicated to do if you don’t know how to twist or braid but, I promise, it’s easier than it sounds.

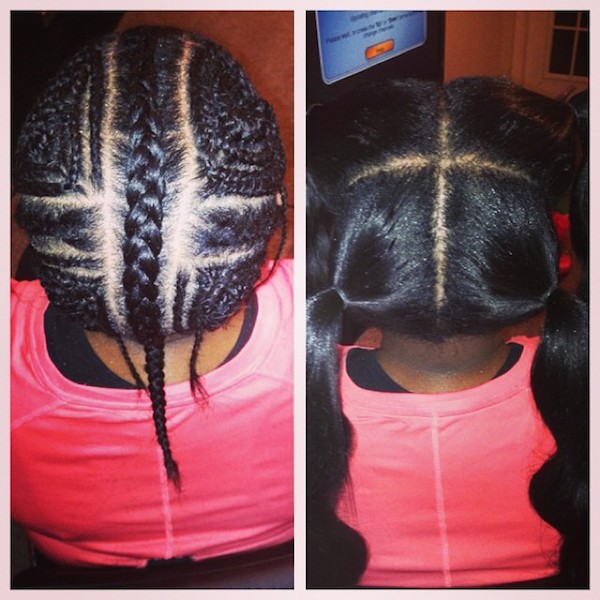
First step is to section hair as if you were going to get corn rows. The wider the section, the bigger the curls and vice versa.

Second step is to twist each section. The best way to section the hair is to have all sections connected to the middle of the head so that you can began twisting from the middle. This helps with styling.

curl7

(http://blacknaps.org/2014/07/16/3-easy-go-to-styles-for-looking-cute-while-you-work-out/)

The third step is to allow the twist out to sit, I also suggest that you do this before going to bed. Remember that if you can’t twist, you can always use braids instead.

The fourth step is to take out the twist out, be patient because rushing could lead to the tangling of the hair and no one wants to deal with that. I suggest wearing the hair down because the section method makes it easier to wear it down however, style as you pleased.

curl8

(https://thecurlyhairblog.wordpress.com/)

  1. Braid Outs

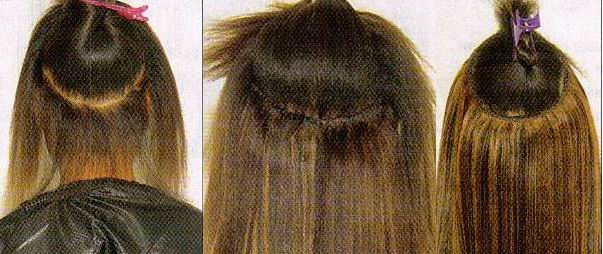
This is one of the easiest curling methods. Simply part your hair, based off of how tight you want your curls. Then braid/plat those sections. This could be time consuming but is worth it.

curl9

(http://angelsringlets.blogspot.com/2013/03/no-more-wet-braidouts-stop-madness.html)

After braiding, let the braids sit for as long as preferred, try to put product in you hair before doing so.

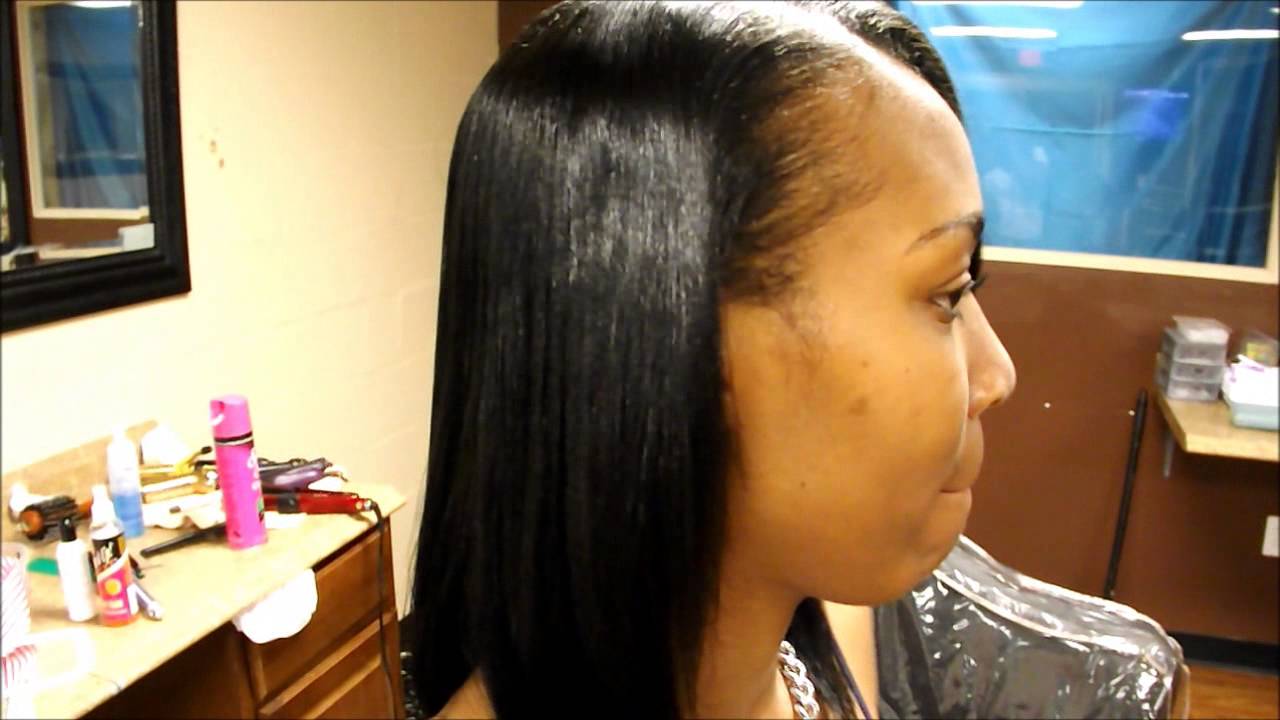
Third, unbraid all of the plats and now you have a head full of curls that can be easily styled. Just think of this method as taking out plats but without kanekalon hair.

curl10

(https://www.pinterest.com/pin/391742867557787862/)

  1. Finger Curling

This will probably be the most time consuming curling method but it is simple and doesn’t require you waiting for the curls to sit. Plus, this style works well for those with shorter hair who want their curls to stay curly.

First, product should be put in the hair such as the typical hair grease or preferred hair oil. Don’t be shy with the oil because your hair needs it for this method.

(Now here comes the harder part) Second, you should take each preferred section and twist it with your finger. Yes, you read that right. Curl your hair with your fingers. I know it sounds ridiculous but it works better than what people may assume.

curl12

(http://curlsunderstood.com/the-coily-fro/)

Third, you can use a comb to give the curls volume and then your hair is ready for styling

curl11

(https://www.pinterest.com/pin/391953973790945731/)

  1. Old School Curling Rods

Time to use the methods our grandmas used. This curly method is to use curling rods. You can buy them at your local hair store and of course at Wal-mart.

First, take the last inch of your hair and wrap it around the curling rod. Do that until the entire head is complete.

curl14

(http://www.curlynikki.com/2014/03/show-and-tell-fierce-friday_21.html)

Second, let the curls sit for a couple of hours. This another one of those methods that I suggest you sleep in.

Third, take out of the curling rods and style as you may please after fluffing for more volume. Add product to improve styling methods, I always suggest the simple hair grease our mothers made us use. Mama knows best.

curl13

(https://www.pinterest.com/shadavajackson/natural-hair/)

5 Types of Sew-ins

Isn’t it so hard to decide? Well time to be informed!

Middle Part

How to – this is the type of sew-in that is braided from the middle. In fact, it’s braided exactly how it’s styled. Using kanekalon hair, the hair is braided from the middle to both sides. Then the back of the hair is braided down to the neck. The tracks of the weave should be sewed in the pattern of the braids. The middle of your natural hair should be out for more of a natural look. However; it is possible to not have any natural hair out but the track will be seen, giving the sew-in an unnatural look. To avoid that, weave can be bought specifically with no tracks at your local beauty store. Weave like that has a specific method with specific glue therefore if you’re a beginner, avoid using it. Practice it first

The braiding pattern of the middle part sew-in

Pros – With your natural hair out, this style could look authentic and as if it weren’t weave. Plus, this style works for almost every type of weave including Yaki, Brazilian or even Indian weave.

A close up of the weave sewn in.

Cons – There aren’t too many ways to style this hair. To avoid showing tracks, the hair must stay in the middle part style which can get restricting and boring. Also, if you decide to leave your natural hair out, you may end up damaging it trying to keep to match the weave you sewed in. If you get a texture of weave that matches your hair texture, then that can be avoided.

The finishing of the middle part sew-in.

Side Part

How to – This style is very similar to the middle part. The only difference is that the braiding pattern is to the side. First, part the hair to the side you prefer. If you decide to have the hair to the left side, then braid the kanekalon hair to the left side. If you have more than 4 inches on the right side, then braid the hair to the right side. If not, then braid the hair to the back. Braid the bottom half of your hair back and then sew the tracks in the pattern of the braids. Your natural hair can be left out but weave with no tracks can be used as well.

Braid your natural hair to make it easier to style when the sew-in is finished!

Pros – This sew in looks very natural because the side part is less seen than what it be in the middle. This shows more of the weave than having the side part be the first thing seen in the hairstyle.

Cons – Though this sew-in has more style options than the middle part, the style methods are still limited to only 2-3 hairstyles.

This could be you after getting a side part sew-in

All Around the World

How to – This sew-in is just like it’s name. The braids are braided in an “all around the world style” meaning the braid begins in the center of the head and is braided in a swirl until there is no more hair left to braid. This will make your head look like a beehive BUT, the style will turn out great. Once the braiding is done, the weave is sewn in. Your natural hair can be left out but, if so, it should be left out at the perimeter of your hair to give your sew-in more styling options.

This is an alternative way of braiding. Instead of starting at the center of your head, you can end there.

Pros – When leaving your hair out, this style has a multitude of hairstyle options, my favorite being the ponytail options. This sew-in also can be worn down and works in any hair texture.

What the sew-in looks like after you start sewing

Cons – Because such little of the hair is left out, the hair can be damaged. In addition, when the perimeter of the hair is weakened, the visual part of the hair looks damaged which could make your natural hair and hairstyle look unattractive. Plus, having your hair damaged could make your hairline retract and make your forehand look bigger.

YAASSSS to that beehive sew-in!

The Vixen

How to – First, part your hair into four sections. Then, braid those four sections to be sewn in. Leave the perimeter of each section out. It sounds weird but trust me, it’ll all work out. Then sew the hair in the way it was braided, after that, you’re done!

sewin4

Understand the four sections now?

Pros – this is my favorite hairstyle because of the amount of pros it has. Because so much of the hair is out, the style looks very natural and can be treated as if it were actual hair. Meaning that you can style the sew-in anyway you want.

Cons – Having this much hair out can make the natural hair to be damaged compared to the hair that’s braided. In addition, this style doesn’t look pleasant unless the weave matches your natural hair. The hair can also be damaged more easily if the weave doesn’t match the weave. The reason why is because one would have to incessantly curl or flat iron the natural hair for it to match with the weave, which is very unhealthy.

Style as you please!

Half Sew-in

How to – This style requires half of your hair to be out, or even a third of it out. To complete this style you must part the middle of your hair horizontally. You can choose how much of your natural hair you want to braid. If you want less of your natural hair out, then braid more than half of your hair. It is solely up to you. Braid the hair to the back so that the weave can be sewn to be worn down.

sewin5

Half weave, half you (:

Pros – This style is a good way to corporate your natural hair. So if you want some added length to your hair, this sew-in is best for you. And if the back of your hair is in an unhealthy state, this sew-in could help give the hair strength to become more healthy. This style also has many alternative hairstyles.

Doesn’t it look like it’s all of her natural hair?

Cons – If the front of your hair is damaged, this style won’t help and could even make it more damaged. This style may be hard to keep up with due to much of your hair being out.

What people will say when your sew-in is on point!

12 Ways to Style Natural Hair

12 Ways to Style Your Hair

These will probably be the fastest and easiest hairstyles you’ll ever do, EVER. The only thing you need is a little amount of time and four hair ties. (Yes, I only typed four hair ties. Trust me, it’s possible) Let’s get started!

1.The Up-do Ponytail

This hairstyle is good for accessories and for making sure there is no hair in your face. If your hair is longer in the front than in the back, then this style is for you. All you have to do is take a fourth of your hair in the front and put it in pony tail. You can add a cute tiara like I did, if you ‘bout that life.

2.The Up-do Bun

If the front of your hair is a little damaged, then putting it in a bun could easily hide that (and in a pretty way). This hairstyle is for small accessories so people can see your nice bun. This is the same steps as the “The Up-do Ponytail”. The only difference is to put the front hair in a bun. To make the style look neat, make sure you brush up your ponytail or even add some smoothing product. The bun allows for people to see the roots of your hair so if any hair is sticking out, it’s obvious. Keep it neat and you’ll look sweet.

3.The Actual Up-do

This hairstyle is one of the fastest hairstyle I’ve ever encountered. It also is good for a hot day because there is no hair on your neck and face. If your makeup is on fleek, this hairstyle is for you. PLUS! If your curls are on point, this hairstyle easily shows that off. It’s literally just putting your hair in a high ponytail. To give more volume, loosen the hair tie or use a bigger hair tie. But wait, there’s more. You can go to sleep in this hairstyle and still look amazing. You could finally be like Beyoncé and wake up like this, minus the makeup.

4.The Pompadour

This style works well when you’re trying to show off the length of your hair in the back. It also doesn’t put too much hair in your face so the wind can blow as much as it wants, you don’t have any worries. This style is like a cheat because you can wear you hair down without dealing with “my hair is down” problems. The first step is to part the pompadour. Once that is done, style the pompadour the way you want, then twist the ends. Take a section of your hair in the middle and put it in a ponytail with the pompadour to keep it down. You could also use hair pins but this way works if you only have hair ties. Next, take the left and right sides of your hair and put it in a ponytail, together, in the back of your hair. You are now in a different hairstyle!

5.The Half Minnie Mouse

This is hands down one of my favorite hairstyles. It’s like Disney in the front and MTV in the back. This style is also easy to wrap up at night. You wake up and it’s still in two nice buns. If your edges are struggling, this style helps prevent people from seeing that struggle. All that needs to be done is to part a fourth of your hair in the front. Then part that fourth in half; put each half in a ponytail then in a bun. If you’re feeling lazy with the bun, you could leave your hair out and still look fantastic.

6.The Red Sea

If your edges (the hair that is the perimeter of the front of your head) are looking flawless, this style may be perfect for you. This style works for when your face is almost as nice as your edges, simply because the front is pulled back. So if you finally did perfect winged eyeliner, use this hairstyle to show it off. All you have to do is part the fourth of your hair. It’s called the Red Sea because you part the hair in half. You can braid or twist each half. I chose to twist because it’s easier and faster but, it’s up to you. Once both halves are done, put them to the back in a ponytail. BAM! Now we can see more of that beautiful face.

7.The Tied and to the Side

If you’re feeling a little lazy but a lot of crazy, you’re welcome that I came up with this style for you. This style works well if you had an AWESOME pair of earrings but lost one. You don’t have to wear both earrings with this style, so rock the one earring. This style also shows off the length of your hair. Take one side of your hair and put it in a back ponytail then pull it to the side. If you don’t want to use a ponytail, you could braid or twist it to the side. Be free!

8.The Three Thirds

I call this style the Three Thirds because your hair is doing three different things. The front of your hair is a bang that you can easily adjust. The middle part of your hair is put into a simple ponytail then the back is left to hang and look long and curly. This style also works for those into huge earrings. Time to see those hoops!

9.The Big Bang

Although it’s called the Big Bang, trust me, this style is so much easier than the theory. This style works for when you’re tired of having your hair all over your neck. For those who are so accustomed to the huge ponytail, try to expand and give the style a chance. How to do the style is to take half (or how much you feel comfortable with) and put that in a high ponytail. Then style the front into a bang.

10.The Can’t Commit

This is one of the styles that let’s people know that you’re fun, crazy and easy to work with. Basically, you’d take the back of your hair and put it into a high ponytail. The front can be styled based on what you prefer. I chose to have mine parted in the middle to keep it fun but, it’s still up to you.

11.The Full Minnie Mouse

If the Half Minnie Mouse wasn’t enough for you, don’t worry, I gotchu! For the extra crazy and enthusiastic people out there trying to exemplify themselves in their hairstyles, this is for you! And this is a extra easy one as well. Just part your hair down the middle, all the way to the back middle of your head. Then put both halves in a ponytail. You are now Minnie Mouse. You’re Welcome. P.S. you can put the two ponytails in buns for that extra Minnie Mouse effect.

12.The You

The best hairstyles are hairstyles that show one’s personality. If you love yourself as much as you love your hair, this style is for you. It’s just one step: Wear. Your. Own. Hair. Down. Sometimes styling is a hassle therefore just wearing your natural hair out makes things a little easier. This is the easiest hairstyle! Just be yourself, and the hair will follow.

Black Hair Myths

blackmyths4

When you realize that you’ve believed a lot of black hair myths…


Cutting Your Hair Makes It Grow?

Hate to break it to you but, there has been no proof that cutting your hair makes it grow. The growth of your hair is dependent on the hair follicle, also known as the roots. Therefore the ends of your hair doesn’t have effect on your hair roots. In fact, the ends of your hair has the least amount of effect on your roots. So stop wasting money on the salon to lose inches your amino acids worked hard to create!

blackmyths1

But What About Split Ends?

Want to know a secret? Cutting your split ends won’t make you hair grow either. Shhh…don’t tell anyone. Surprising isn’t it? Split ends are at the end of your hair and have a very small effect on the root of your hair, which is where all hair growth begins. HOWEVER! Split ends can damage your hair to make it look unhealthy. The only effect split ends can have on your hair growth is if the split end splits at the root of you hair. That rarely happens and if it did occur regularly, you’d be told to cut all of your hair instead of just your ends. So take advantage of your freedom and make the choice whether YOU want to cut you split ends.

blackmyths2

White Hair Grows Faster Than Black Hair?

No race has a faster hair growth compared to another. Shocker right? Hair growth is dependent on genetics and there hasn’t been a gene that suggests faster or slower hair growth. Hair growth is also dependent on one’s health and diet which has nothing to do with race.

“But Choya, I eat healthy, take care of my hair and even take supplements and I still don’t see my hair the length as my white friends?”

Well first, as a human race we have to stop comparing each other. Instead of focusing on differences, let’s focus on similarities. Also, African American hair has a different texture, meaning that the shrinkage compared to other hair texture shrinkages differentiate. The texture of caucasian hair is straighter than black hair so unless you straighten your hair perfectly, you won’t be able to see a legit length of your hair. In other words, you can’t see the exact length of your hair like some other races can, that doesn’t mean that your hair growth is slower. In addition, because of the kinkiness in black hair, the hair tangles easier than other textures. This could lead to your hair getting entangled and breaking. Protective hairstyles such as braids, plats, rope twist and more are a solution to avoid this.

blackmyths3

Proof that shrinkage can be soooo real..but! Your hair is growing!

Black People Only Wear Weave?

Weave originated in Africa therefore it’s a huge aspect of the African American culture. (Wigs, a type of weave originated in Egypt which is in Africa so technically, weave did begin in Africa) However, just like music, clothes and other factors of culture, black people are not the only ones who’ve taken advantage of weave. There are millions of other races who wear wigs, weave, braiding hair and more! In fact, lace front wigs were a big part of the Chinese culture before becoming a trend in America. A great amount of extension types were used in other cultures before being used in African American culture. Many models find themselves in extensions, half wigs, and kanekalon hair before a shoot. So black people definitely are not only the race wearing weave. Who knows? Maybe there’s another culture out there that uses it more!

blackmyths5

Your face when people try to tell you about a black hair myth!

I Can’t Believe It’s Not Weave: Yarn Plats/Braids

I’ve been told multiple times that my hair is very unique. I’ve been asked even more times what material do I use to do my hair. Well, to answer that I must say yarn. Yes, yarn. I use it as a hairstyle and according to the many people who’ve complimented it, it doesn’t look horrible as some may assume. In fact, yarn as hair is extremely similar to Marley Braiding hair, Kanekalon hair and dreads. Or in other words, hair used to braid hair. People also ask how are braids possible and how long does it take; well here are those answers.

tumblr_mqnr9g7nge1qilhrzo1_500

First, buy the yarn. You can use any type of yarn and yarn from anywhere, for example, yarn from Walmart. Second, choose the yarn color you prefer. The color I’ve used was teal and fuschia purple. Yarn comes in many sizes however; it is cheaper than buying actual hair so go crazy! Buy as much as you feel would suffice and whatever is left over can be used for a nice scarf. Because yarn is so cheap, I always encourage people to buy more than what they think they need. There’s nothing worse than running out of yarn and being tempted by the scarf your grandma knitted for you.

rayjgrandma

Your grandma’s face after she sees that you used the scarf she gave you for your hair..

Third, figure out how long you want the yarn to be such as shoulder length or to your back. Once that is done, you can cut the yarn using that estimated length. This is a very tedious task BUT it’s worth it. The best method is to get the length of the yarn and keep folding that length over and over. It’ll look like a huge “O” but once you cut it in half, life will now make sense.

20150921_223444

The Yarn should look like this. Cut in half for braiding; also cut to avoid tangling.

Fourth, once you’re done cutting the yarn, separate the yarn into pieces divisible by three. If you want small braids, have three pieces of yarn separated. And if you want it bigger, have six pieces or nine pieces. You can have as many pieces as you want but again, make sure they are divisible by three. I separated my yarn pieces using nine pieces each. The reason why it has to be divisible by three is because braids require three pieces being crossed over each other until it becomes the braids we are familiar with. Once you’ve separated the yarn, you can finally begin the insertion.

20150921_223543

This is what the yarn plat should look like; the size may vary.

Separate your hair and part it into a section of where you want the yarn to be braided in. Once that is done, you can braid the yarn in as if were Kanekalon hair. You continue this process all over your head until you have a head full of yarn. Tie a knot at the end of each plat to avoid the braid untangling.

20150921_223606

This is what the knot should look like; cut the excess at the ends for a clean plat.

This process can take hours depending on how fast or slow the person is doing it takes. Yarn hair can last up to last for about a month or two, maybe even three; it all depends on your new growth. It can be styled as if were actual hair or plats, with minor difficulties. It could even be washed but does take longer to dry. Just a warning, if you wash your yarn hair, be prepared for the hours of blow drying it. I let mine air dry and took days, yes days! However; not only is it healthy for your hair and provides a protected style, it also makes you unique in your own way. So let’s see you shake those yarn braids and hear people tell you “I can’t believe it’s not a weave!”

Snapchat-7041828084818082760

Here is my finished product! Below is another yarn hairstyle with a teal color instead!

Screenshot_2016-03-17-20-38-28-1

Which yarn color do you prefer? Leave a comment below!

If you feel like you need more information or visuals, check out this 7 part tutorial for in depth details. The link is below!


Extension Decisions

Winter is coming up and the temperatures are going down. Now that you don’t have to worry about long hair making you hot, you may want to add some length and extensions may be a weighing choice for you. Extensions can seem a little complicated at times since there are so many choices. But Hungry Hair is here for you! To tell you the pros and cons of types of extensions and how expensive they are.

giphy-2

Winter is coming, time for some long hair!

Clip-In Extensions

clip-in-hair-extensions-023

These extensions are easy convenient because they are so easy to put in. You simply just clip them in your hair. You can sleep in a little because you know your hair won’t take that long to do. Clip-ins are self installed so you save money on getting them. On the other hand, they do cause balding and thin out hair. If you just got a perm relaxer or trying to get your natural length back, these are not for you. But if you really feel like you absolutely need clip-ins in your life, try getting ones that are not too heavy, meaning less hair. The more and longer the hair, the heavier the extensions and the more damage it can bring.

33

Clip-ins are not expensive but depending on your desired look, you may have to buy more than one clip-in. And if you yearn for Brazilian, Remy, Indian hair, please realize that the prices will fluctuate.

Sew-In Extensions

weave-hair-extensions-brunette

Sew-in extension are just like sew-ins in general, just easier! Instead of braiding your entire head and sewing all the weave, you have certain parts braided for the extensions. These extensions last a long time and look genuine. However, they are expensive and isn’t a “Do it Yourself” hairstyle. They also take awhile to install. Not only would you have to buy bundled weave, but depending on the thickness of your hair, you might also have to buy braiding kanekalon hair. Though it could hurt your bank account, there will be little, if any, damage to your hair. It could even help your hair grow by being a partial protective style!

200

When you do your sew-in extensions yourself and then get a compliment on it

Pre-bonded Extensions

Pre-Bonded-Hair-Extensions-1

First off, this takes hours to apply so make sure there is enough time set aside from your day. These extensions can last up to three months, with washes! Also, they are very small which gives you room for styling. These extensions do require glue strips which damages the most important part of your hair, your roots! They do take awhile to take out and could be troublesome when doing so. They are also expensive to buy and to get because a professional has to install them. They don’t work for everyone but you never know until you try!

Tape Hair Extensions


tape-in-hair-extensions-instrction-2

If you’re looking for extensions that are EXTREMELY hard to tell is there, these might be for you. They are taped to your hair and can last for over a month. They are also easy and quick to put in. They might fall out easily if not installed correctly, they also can damage your roots and pull your hair. You can wash your hair with these extensions but that leads to them being able to fall out easier. These are on the expensive side to buy but don’t require a trip to the salon.

200-2

When your tape extensions don’t fall out after taking a shower

Micro-link Extensions

0_0_0_0_315_236_csupload_28830146

These. Take. A. Very. Very. VERY. Long. Time. If you’ve ever had micro-plats or rope twists, then you understand the time. BUT! They do last a few months and look as if they weren’t even there. Black females have given much positive feedback on this kind of extension. There is minimum damage to the hairs because the process only includes mixing actual hair and extensions into a micro link, similar to hair cuffs. It is expensive because it requires a lot of supplies but sometimes you have to “treat yo’self”


4eb422fd12e7a021b4adf3441f3fd15b

giphy


Treat Yo’Self…to some extensions!